
The workspace tour
This page names the main parts of the Octostitch window so the rest of the docs have a shared vocabulary.
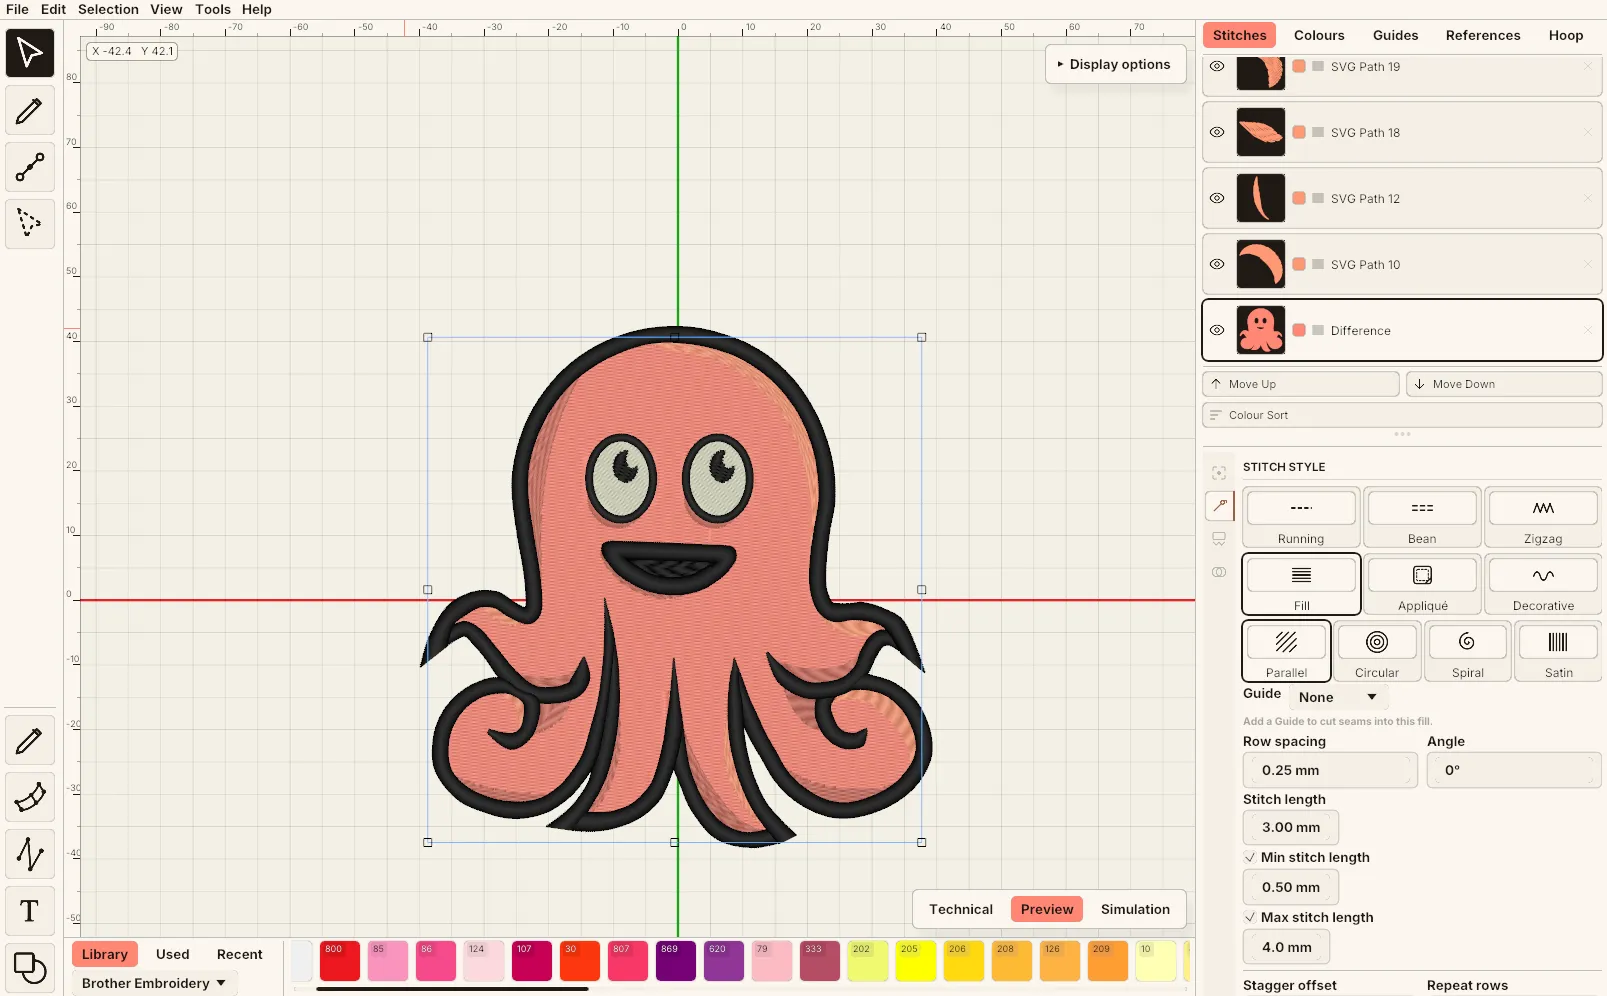 The Octostitch workspace: toolbar (left), canvas (centre), side panel (right) and thread bar (bottom).
Across the top is the menu bar:
| Menu | What’s on it |
|---|---|
| File | New, Open (with a recent-files list), Save, Save As and Export |
| Edit | Undo and Redo, Copy, Paste and Paste in Place |
| Selection | Select All and Deselect, Combine and Break Apart, the booleans, Mirror and Branch |
| View | Zoom in / out, reset to 1:1 and zoom to fit |
| Tools | Font authoring, decorative motifs, the QR code and pixel art generators, and stitch-out simulation |
| Help | The docs, the keyboard shortcut list, Check for Updates…, your licence and About |
Everything on the Selection menu also has a keyboard shortcut and a button in the side panel’s Modify group — the menu is there so you don’t have to know the shortcuts.
The toolbar
Section titled “The toolbar”The narrow toolbar down the left edge holds the editing tools. Which tools appear depends on what you have selected, but the full set is:
| Tool | Shortcut | What it does |
|---|---|---|
| Select | V |
Select, move and transform objects |
| Pen | B |
Draw and extend Bézier paths |
| Edit nodes | N |
Move anchor points and control handles |
| Meta nodes | M |
Place meta nodes that vary width/angle along a path |
| Satin column | C |
Draw two-rail satin columns |
| Ruler | R |
Drag out on-canvas measurements (offered when nothing is selected) |
At the bottom of the toolbar are the create buttons — Bézier, Satin, Manual, Text and Shape — which arm the canvas to place a new object of that kind on your next click (or drag).
 The toolbar: editing tools at the top, create buttons at the bottom.
The side panel
Section titled “The side panel”The panel on the right is organised into tabs:
- Stitches — the object list: every element in your design as a layer stack, the bottom row sewing first and the top row last.
- Colours — your design grouped by thread colour, for reordering colour blocks.
- Guides — the non-stitching guide paths that steer a fill’s direction or cut seams through it.
- References — imported reference images you’re tracing over.
- Hoop — the hoop frame drawn on the canvas.
Each row in the list has a thumbnail, a visibility toggle and the object’s thread colour. Below the list, Move Up and Move Down shift the selection through the sewing order and Colour Sort groups the design by colour to cut thread changes.
The bottom half of the panel holds the settings for whatever is selected, grouped behind the narrow strip of icons down its left edge. Only the groups that apply to the current selection appear, so the strip doubles as a map of what you can edit right now:
| Group | What’s in it |
|---|---|
| Object | Name, thread colour and stitch count |
| Stitch | The stitch style — Running, Bean, Wide run, Zigzag, Fill, Appliqué or Decorative — and all of that style’s settings |
| Underlay | Underlay for fills and satin columns |
| Ties & trims | Whether this object locks and cuts its thread the way the rest of the design does, or its own way |
| Shape | Parameters for a parametric shape |
| Text | A text box’s contents, font and layout |
| Modify | Combine and Break Apart, the booleans, Mirror H / V and Branch — then, below a separator, the conversions: Convert fill to satin column, Bake to manual stitches and Bake to Bézier paths |
| Meta node | The selected meta node’s width and angle |
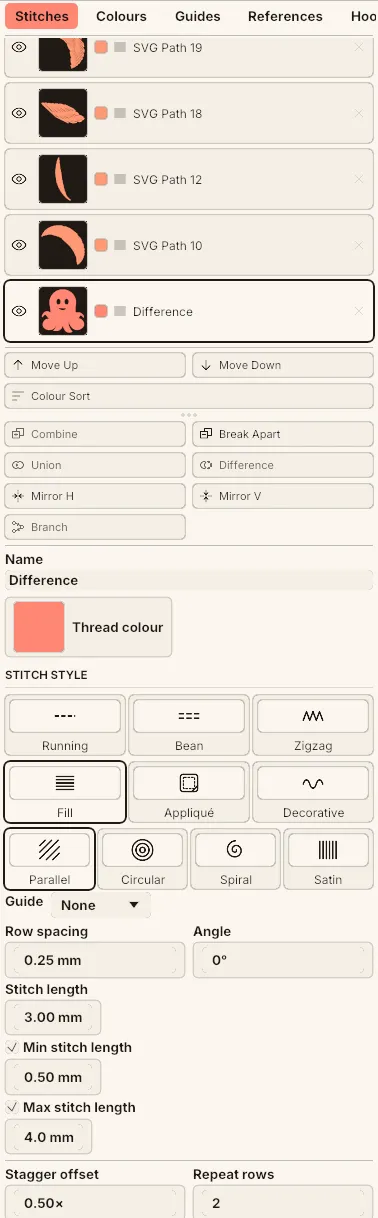 The side panel: the tab bar and object list above, and the selected object’s stitch style and settings below.
The canvas
Section titled “The canvas”The central drawing area works in real-world millimetres. It can show a grid, axes and rulers and an optional hoop frame so you can see how your design fits the machine you’ll sew on.
- Pan with a middle-mouse drag.
- Zoom with the scroll wheel (or
Ctrl +/Ctrl -,Ctrl 0to reset,Ctrl Shift Fto zoom to fit).
With the rulers on, the cursor’s position in millimetres is read out in the top-left corner, along with the centre and size of whatever is selected. Display options, in the top-right, is where the grid, axes and rulers are switched on and off — plus the grid’s spacing — along with Show all guides, which keeps every guide on screen rather than only the ones the selection uses.
The thread bar
Section titled “The thread bar”Along the bottom is the thread palette bar. Switch between Library (a chosen brand palette), Used (colours already in your design) and Recent, and pick the brand from the dropdown beneath the toggle. Each swatch shows its thread code; click one to recolour the current selection. See Thread palettes.
 The thread bar with its Library / Used / Recent toggle and a row of swatches.
View modes
Section titled “View modes”The Technical / Preview / Simulation switch in the bottom-right corner of the canvas (also on the View menu) changes how the design is drawn, and Simulation adds stitch playback. These are covered in View modes.