
Fills
A fill covers a closed area with stitches. Fills only generate stitches for closed paths — the shape has to enclose a region to be filled. Octostitch offers several fill algorithms, each with its own look and its own settings.
Parallel (tatami) fill
Section titled “Parallel (tatami) fill”The workhorse fill: parallel rows of stitching laid in a back-and-forth (boustrophedon) order across the shape.
- Row spacing — distance between rows (the density). New fills start at 0.3 mm, which covers cloth in one pass without the underlay showing through at the row boundaries.
- Angle — the direction the rows run.
- Pattern — a tatami pattern naming every needle drop, or None for the plain stagger below.
- Stitch length — the step size along each row.
- Min / max stitch length — optionally skip tiny segments and cap long ones.
- Stagger — the classic tatami effect: each successive row is shifted by a fraction of a stitch so the needle points don’t line up into visible “tramlines”. Set the stagger fraction (0.5 = classic half-stitch tatami) and how many rows before the pattern repeats.
- Random variation — jitter stitch lengths to further break up any pattern.
Patterned rows
Section titled “Patterned rows”Setting a Pattern replaces the even step-and-stagger with a designed grid of needle drops — a weave, a herringbone, a stipple. The pattern gives every stitch its own length, so Stitch length, Stagger and Random variation disappear from the panel while one is set, replaced by Pattern scale for sizing the motif and Row repeat for stretching it across the rows. Row spacing, angle and the min/max limits still apply.
See Tatami patterns for the full list, and for drawing your own in Tools → Design tatami pattern…
Circular & spiral fills
Section titled “Circular & spiral fills”For round and radial shapes:
- Circular — concentric rings expanding outward from a centre point.
- Spiral — a single continuous Archimedean spiral, which minimises jump stitches because it’s one unbroken path.
Both take a ring spacing and a stitch length, plus their own min / max stitch length; by default the centre is the shape’s centroid.
Circular fill adds a seam offset per ring. Each ring has to start and end somewhere, and if every ring breaks at the same angle those breaks stack into a visible seam running out from the centre. Turning the start point a few degrees on each successive ring scatters the breaks around the shape instead, so nothing lines up.
Stitch-length limits
Section titled “Stitch-length limits”Most fill algorithms take an optional min and max stitch length alongside the nominal stitch length. Both are off until you switch them on:
- Min stitch length — drops segments shorter than this. Very short stitches pile thread in one spot, can jam a machine, and are usually artefacts of a row clipping a narrow corner of the shape.
- Max stitch length — caps how far a single stitch may reach, splitting anything longer. Long unsupported stitches snag and drag the fabric in.
Satin fill
Section titled “Satin fill”A satin fill spans the shape edge-to-edge with satin-like rungs at a chosen angle, with spacing, pull compensation and a max stitch length. It suits shapes narrow enough to read as satin but defined as a fill region.
Guided fills
Section titled “Guided fills”A guide is a non-stitching path that steers a fill’s direction. Instead of straight parallel rows at a fixed angle, a guided fill follows the guide so the stitch direction flows around curves — ideal for organic shapes like leaves and petals where a single fixed angle looks wrong.
Pick one from the Guide dropdown on a parallel fill. See Guides & cut lines for how to draw and manage them.
A guided fill lays its own even stitches along the guide, so a tatami pattern, the stagger and the random variation don’t apply while a guide is assigned.
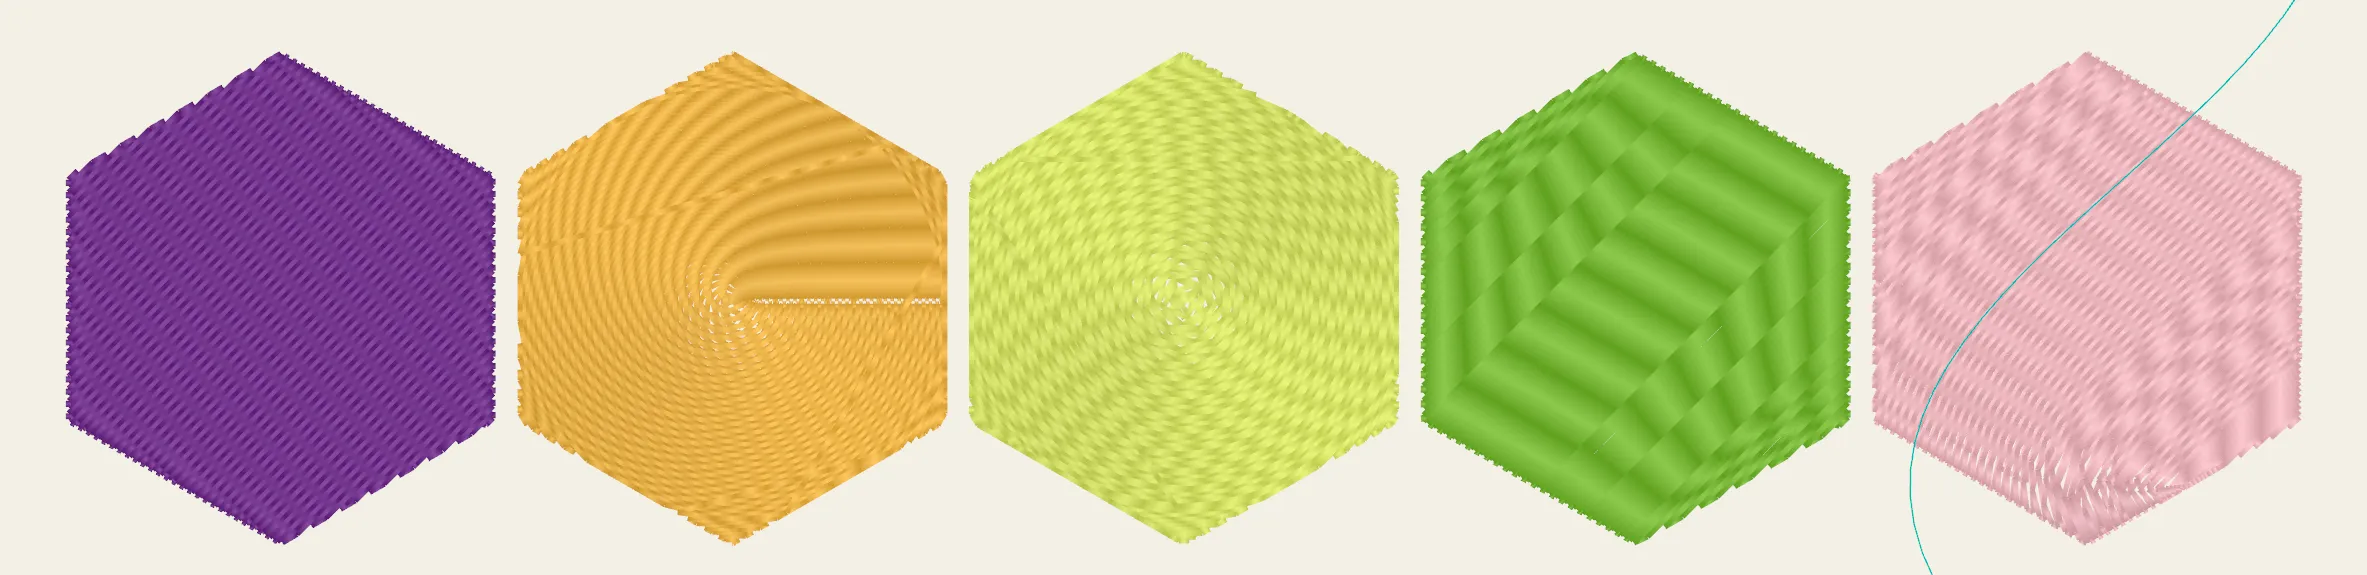 The same hexagon, five ways — left to right: parallel (tatami), circular, spiral, satin, and a guided fill flowing along the curve drawn across it.
Gradients
Section titled “Gradients”A gradient blends a fill through several thread colours. Tick Gradient in the fill’s settings to add a two-stop ramp from the object’s own colour to white.
A machine sews one thread at a time, so a gradient isn’t a blended colour — it’s a set of passes, one per stop, sewn in order. The fill is generated once at its normal density and each of its stitches is then handed to whichever stop wins where it sits. Nothing is added and nothing is dropped, so a gradient neither thins the coverage nor builds thread up where two colours meet.
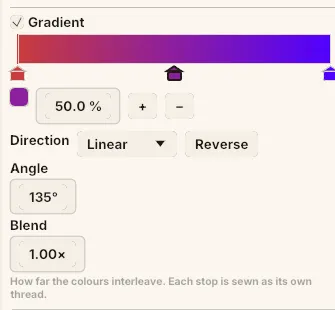 A three-stop ramp with the middle stop selected at 50%. Linear at 135°, blending at full width — the line underneath is the reminder that each stop is sewn as its own thread.
The stops
Section titled “The stops”The ramp strip shows the stops; click one to select it. Underneath:
- Colour swatch — the stop’s thread colour. Picking from the thread bar while a stop is selected names that stop rather than repainting the whole object, so the stop carries a real thread — catalogue number and all — into the export.
- Position — where the stop sits along the axis, as a percentage. It’s held between its neighbours, so stops can’t cross.
+— add a stop beside the selected one.−— remove it. Two stops is the least a ramp can be made of.
Direction, angle and blend
Section titled “Direction, angle and blend”- Direction — Linear (a straight ramp) or Radial (out from the fill’s centre to the furthest point of the shape).
- Reverse — flip the ramp end for end.
- Angle — which way a linear ramp is aimed. A new gradient starts square to the fill’s rows, because ramping across the rows rather than along them is what makes the blend read as a blend. Radial ramps have no angle.
- Blend — how wide the band is where two stops interleave, as a fraction of the span
between them.
0gives hard bands, each stop sewn as a solid block of its own thread;1blends the two across the whole span.
How the blend is stitched
Section titled “How the blend is stitched”Taking the nearest stop everywhere would give hard-edged bands, so near a boundary the assignment is dithered by row: some rows go to colour A and some to colour B, in a ratio that shifts across the band. The unit is the whole fill row — a threshold that changed stitch to stitch would shred every row into two-stitch fragments, each one a trim.
Two useful cases fall out of the same rule:
- Ramp across the rows — whole rows alternate between the two colours. The classic blend.
- Ramp along the rows — each row changes colour once, at a point that jitters from row to row, so the boundary comes out ragged rather than ruled.
Anything too short to be worth a trim is merged into its neighbour, so you never get a two-stitch island of the other colour.
The design view draws the ramp smooth, because that’s the design intent. Preview and Simulation show the interleaved passes it really sews.
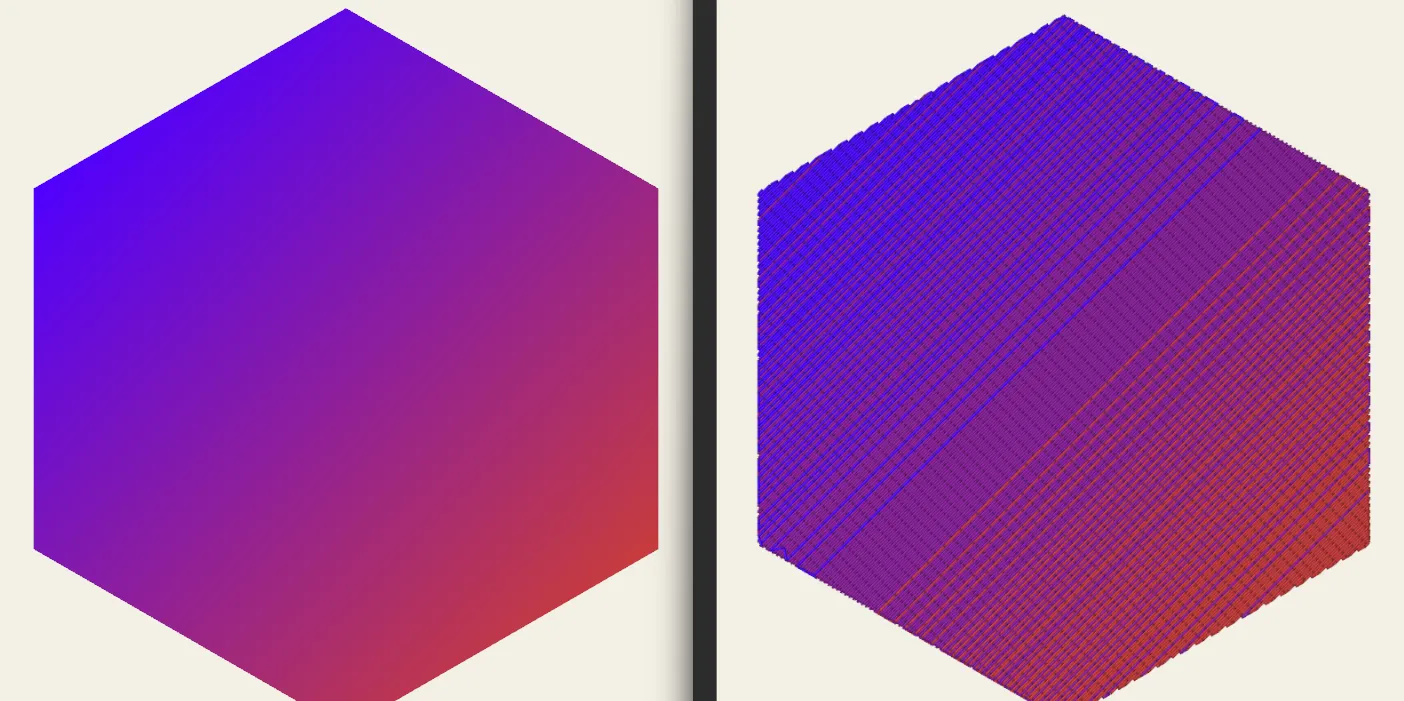 The same three-stop fill, designed and sewn. Left: the smooth ramp Technical view draws. Right: what the machine does — solid rows of one thread or the other, interleaving through the middle where the two stops hand over.
Start & end points
Section titled “Start & end points”Parallel and satin fills honour the start and end markers placed with the Meta tool. A marker dropped inside the shape re-routes the fill to open on the row it lands on — it isn’t merely walked into — and an end marker moves the last needle drop to the row that finishes nearest it.
The fill still sews every row edge to edge, and the walk between pieces of a split stack is travel, not a trim, so a re-ordered fill still comes off the machine as one colour block. Circular and spiral fills sew outward from their centre and ignore the markers.
Cut lines
Section titled “Cut lines”A guide can also be used the other way round — not to steer the fill, but to draw a seam through it. Assign one or more guides as cut lines and every fill stitch crossing a cut line is split on it, so a row of needle penetrations marks the line on the fabric: the segments of an orange, the panels of a football, the fold of a petal.
Cut lines work on every fill algorithm and don’t change the stitch order or routing. Tick them in the Cut lines section of the fill’s settings — see Guides & cut lines.
Inset from boundary pulls the whole fill in from the shape’s outline by a set distance. It’s off by default. Use it when the fill is going to be bordered by a satin column or an outline that would otherwise sit on top of the fill’s own edge stitches — insetting the fill leaves the border a clean edge to cover.
Fill rule (holes)
Section titled “Fill rule (holes)”Compound shapes use a fill rule to decide what’s inside vs a hole:
- Even-odd — the editor default; overlapping same-wound contours become holes.
- Non-zero — used for imported vector art (TTF glyphs, SVG), so the crossbars of an “x” or the junctions of a “t” fill correctly.
See Combine paths & break apart for building shapes with holes.
Fill underlay
Section titled “Fill underlay”Fills lay down underlay first:
- Contour — a running stitch just inside the outline.
- Tatami — a loose fill laid across the top stitching, at its own Tatami spacing and Tatami angle.
An inset keeps the underlay inside the edge so it stays hidden under the top fill.
The tatami angle is measured off the fill’s own rows, not off the canvas. 90° —
the default — is square across the top stitching, which is where an underlay does the
most good, and it stays square when you re-angle the fill. The panel reads back the
heading it works out to: “Angle is measured off the fill’s rows — sews at 120°”. A fill
sewn in rings has no row angle to measure from, so there the number is the absolute
heading and the panel says so.
New fills come with tatami underlay on (1.5 mm spacing, 90°, 1.5 mm inset), because a fill of any size wants a base under it far more often than not. Turn it off in the Underlay group for small fills where it isn’t earning its stitch count.
Underlay settings have their own group in the side panel, but the Stitch group shows a summary button — “Underlay: Tatami” — that both tells you what’s on and takes you there.