
Authoring decorative motifs
A decorative motif is the small stitch pattern that a
decorative stitch tiles along a path. You author your own
motifs and save them as reusable .octodeco files.
Building a motif
Section titled “Building a motif”A motif starts from a manual stitch object — the individual points are the motif:
- Digitise the motif as a manual stitch run — one tile’s worth of the pattern.
- Choose Tools → Create decorative stitch…
- Refine the motif in the editor (below), give it a name, and click Done.
Once saved, the motif appears as a pattern option on the decorative stitch type, ready to tile along any path.
The motif editor
Section titled “The motif editor”The editor shows your motif on the left and a chained preview on the right, so you can see how the tile joins to copies of itself as you work — which is the thing that’s hard to judge from a single tile.
Navigating: middle-drag to pan, scroll to zoom. The view stays put while you drag a node, so nothing rescales under the cursor.
Editing nodes:
- Drag a node to move it. Double-click the path to add one, and Delete removes the selected node (a motif needs at least two).
- The first node is green and the last is red. These are the two that join neighbouring tiles.
- Corners are drawn as diamonds, curves as circles. Select a node and use the Curve and Corner buttons to convert between them.
- On a curved node, drag a handle to bend the curve. The two handles mirror each other by default; hold Alt to break the mirror and shape each side independently.
- Jump to node trims the thread and moves to that node without stitching. Use it for motifs made of separate marks — a dotted line, or a pattern with detached elements — rather than one continuous run.
Curved motifs
Section titled “Curved motifs”Adding a curve to any node makes the motif a Bézier motif, and Octostitch treats it differently when tiling: instead of stitching fixed points, it re-samples the curves at placement time using the Curve step setting on the stitch. The practical effect is that a curved motif stays smooth at any size — tile it at 4 mm or 40 mm and it won’t go visibly faceted.
Keep a motif all-corners if you want its points sewn exactly as authored (angular patterns, hand-look stitching, anything where a specific needle position matters).
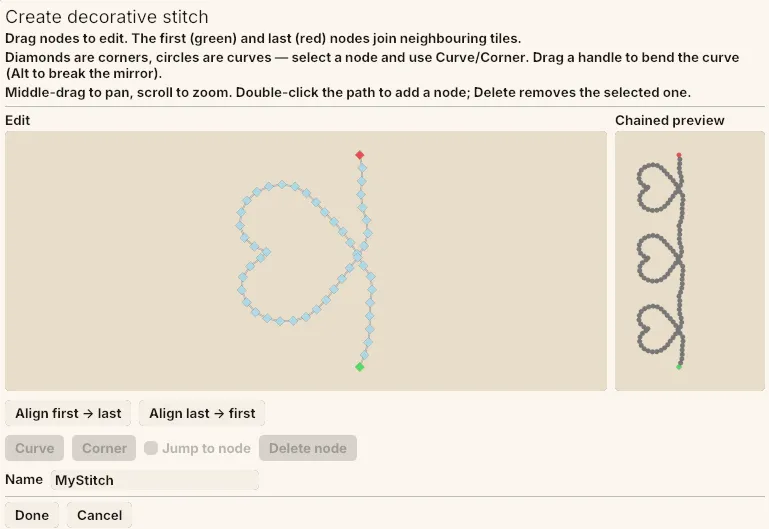 The Create decorative stitch editor — the motif’s nodes on the left (green first, red last), with the chained preview on the right showing how the tile repeats.
Designing a tile that repeats cleanly
Section titled “Designing a tile that repeats cleanly”The one rule the editor enforces is that the first and last nodes must line up horizontally — Done stays disabled until they do. That’s what lets one tile hand over to the next without a kink at every join. The Align first → last and Align last → first buttons snap them for you, so you can draw freely and square it up at the end.
Beyond that, watch the chained preview rather than the tile:
- Aim for the thread to leave the last node heading roughly the way it enters the first, or every join gets a visible corner.
- Keep the motif’s height balanced around the path line if you want it centred; offset it deliberately if you want the motif to sit to one side.
- Trailing detail near the end node ends up right next to the leading detail of the next tile — if two features are going to collide, that’s where.
Where motifs live & sharing them
Section titled “Where motifs live & sharing them”A saved motif is a single self-contained .octodeco file, so you can share one by
copying the file — or bring one in with Tools → Import decorative stitch…
For now, your motifs are stored in the user decoratives folder:
- Windows —
%APPDATA%\octostitch\decoratives - macOS / Linux —
octostitch/decorativesunder your config directory (e.g.~/.config/octostitch/decoratives)
Octostitch reads its bundled motifs and this folder, with your motifs taking priority if a name clashes.