
Tatami patterns
A tatami pattern decides where the needle lands on every row of a parallel fill. Instead of even stitches nudged along by a stagger fraction, a pattern names each needle drop outright — so the penetrations line up into a motif you can see in the finished fill: a weave, a herringbone, a ripple, a stipple.
Patterns ship with Octostitch, and you can draw your own in Tools → Design tatami pattern…
Applying a pattern to a fill
Section titled “Applying a pattern to a fill”Select a fill, open the Stitches tab and set its algorithm to Parallel. The Tatami pattern picker at the top of the fill’s settings shows every pattern available — None is a plain stagger, as before.
You pick from swatches of the pattern sewn as cloth, drawn in the object’s own thread colour, rather than from a list of names: what separates “Twill 6 mm” from “Sand 5 mm” is a texture, and only a picture of it says which is which. Each swatch is captioned with its repeat width and row count. The button in the picker’s top-right corner switches between a list (one pattern per row, named) and a grid (as many swatches to a row as fit) — the same toggle the decorative motif and font pickers use, and the choice is shared between all three and remembered between sessions.
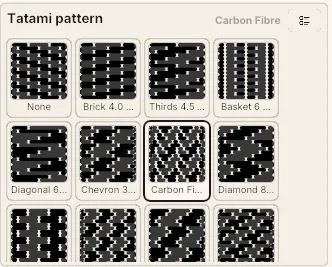 The picker in grid view. Every pattern is a swatch of itself sewn in the object’s own thread, None included; the selected pattern’s name sits in the header, next to the list/grid toggle.
- Tatami pattern — which motif the fill’s needle drops follow.
- Pattern scale (0.1×–10×) — resizes the motif along the rows. Every length in the pattern multiplies, so a 6 mm repeat at 2× becomes a 12 mm repeat with stitches twice as long. The motif keeps its shape — the same needle drops in the same order — it just sews bigger or smaller.
- Row repeat (1×–20×) — sews each row of the pattern on this many fill rows before the next one starts: a two-row pattern at 2× becomes row 1, row 1, row 2, row 2. This is the motif’s other axis, and the only one there is: rows belong to the fill’s own spacing, not to the pattern, so scale can’t stretch them.
Underneath, the panel reports the range of stitch lengths the pattern will actually sew at the current scale — “Stitches 1.5–4.0 mm”. Watch that line as you scale: with no max stitch length set, it warns you once the longest stitch passes 12 mm; with one set, it tells you those stitches will be split instead. It also flags a shortest stitch too short to sew cleanly.
What a pattern replaces
Section titled “What a pattern replaces”A pattern names every needle drop in absolute millimetres, so three of the plain parallel-fill settings have nothing left to say and are hidden while one is set:
- Stitch length — the pattern gives every stitch its own length.
- Stagger offset and Repeat rows — the pattern’s rows are the stagger.
- Random variation — jitter would move needles off the pattern grid, which is exactly what makes the motif visible.
Row spacing and Angle still apply, and so do Min / max stitch length:
- Max stitch length doesn’t rewrite the pattern — a long stitch can be the point of the design. It keeps the line and adds needle drops along it, so the motif survives and the machine gets a stitch it can take. Splits are staggered from row to row so they don’t sew a seam of their own.
- Min stitch length drops penetrations closer together than the minimum, which does break the motif. It’s off unless you switch it on.
Patterns aren’t only for area fills: a wide run reads the same library along a path, so the same weave or herringbone can run down a band as easily as across a shape.
Row repeat, and keeping a motif’s proportions
Section titled “Row repeat, and keeping a motif’s proportions”Pattern scale stretches a motif along its rows; Row repeat stretches it across them. At a tight row spacing a pattern designed at a looser one comes out squashed, and the row repeat is what puts its proportions back — as a rule of thumb, a pattern drawn for 0.6 mm rows sewn at 0.3 mm wants a repeat of 2×.
It costs nothing in stitch length. Every row still lays exactly the same thread with the same needle drops, so the stitch-length readout and its warnings are untouched by it — unlike Pattern scale, which multiplies every length in the design.
Patterns don’t rescale with the shape
Section titled “Patterns don’t rescale with the shape”A pattern is a design with a size in millimetres, so applying it to a bigger shape gives you more repeats, not a bigger motif — the same way density works. Use Pattern scale when you want the motif itself bigger.
Choosing a pattern
Section titled “Choosing a pattern”Octostitch ships with a set of patterns covering the usual ground — weaves, twills, herringbones, ripples, stipples. Where a pattern’s name carries a size, that’s its repeat width, and it’s the size it sews at whatever the fill’s own settings are.
The only way to choose between them is to look. Apply a few and view them in Preview or Simulation view: at fill densities the difference between two patterns is a texture, not an outline, and Technical view won’t show it fairly.
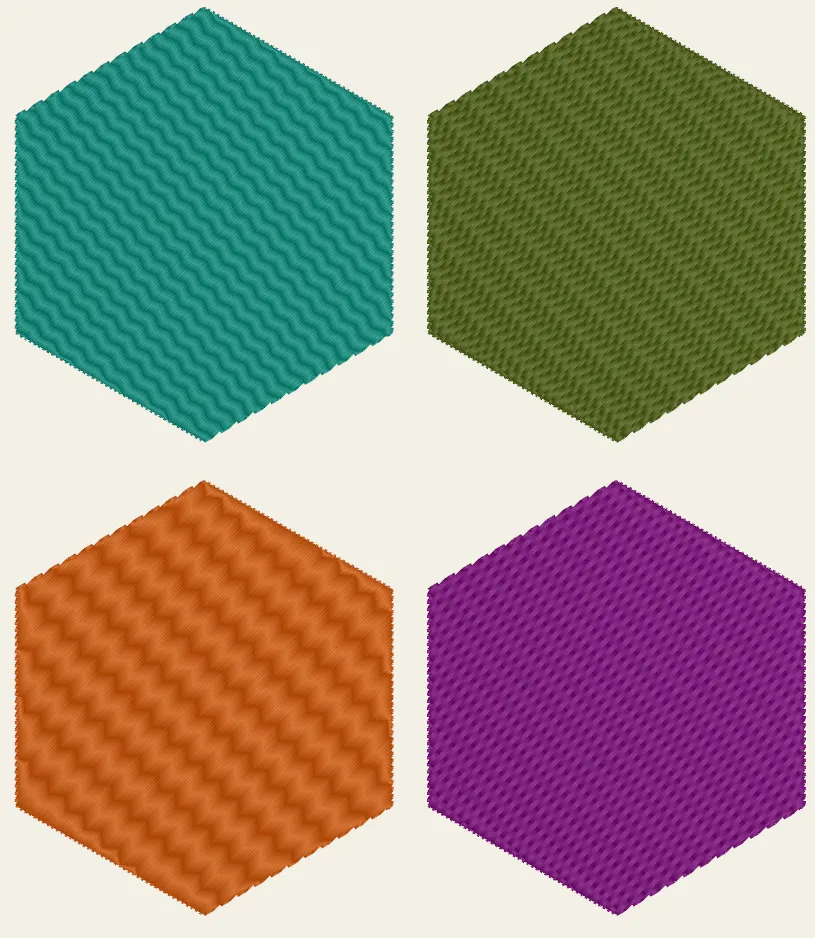 One hexagon, one row spacing, four patterns. Nothing about the shape or the density changed — only where the needle lands.
Designing your own
Section titled “Designing your own”Open Tools → Design tatami pattern… The designer works on one repeat: a grid of rows, each showing where the needle lands across the repeat’s width.
Rows are cyclic
Section titled “Rows are cyclic”The one idea to hold onto: a row’s last stitch runs off the right-hand edge of the repeat and arrives at the first penetration of the next one. That’s what makes brick tatami one full-width stitch per row, offset half a repeat — not two half-stitches.
It also means a row always covers its repeat exactly. A pattern can’t express a gap or an overlap, which is right: a tatami row is sewn edge to edge without lifting the needle, so a gap in one is only ever a longer stitch.
| Tool | Key | What a drag does |
|---|---|---|
| Pencil | P |
Drags out a stitch exactly as long as you draw it — whatever it covers is absorbed into it |
| Move | M |
Drag a penetration to move it (the stitches either side resize), or drag a stitch’s body to slide it along |
| Cut | C |
Click a stitch to drop a penetration in it, splitting it in two |
Modifiers, whatever tool is active:
- Shift-drag offsets the whole row.
- Ctrl-drag borrows the Move tool.
- Right-click removes a boundary (merging the two stitches either side).
- Delete merges the selected stitch backwards.
Navigating: scroll to zoom · middle-drag, Space-drag or Shift-scroll to pan ·
Ctrl-scroll to change the row height.
Controls
Section titled “Controls”- Rows (1–24) — how many rows before the pattern repeats vertically.
- Repeat (up to 60 mm) — the width of one horizontal repeat. Narrowing it folds penetrations into the new width rather than rescaling them, so the stitches you drew keep the lengths you gave them.
- Snap — off, or 0.1 / 0.25 / 0.5 / 1 mm.
- Row spacing — the density the preview is sewn at. Not saved with the pattern — the fill you apply it to owns that setting.
- Thread — the preview colour. Also not saved.
- Fit — frame the repeat again after zooming around.
Beneath the grid, a live fill preview sews the pattern the way the canvas would, and an At the machine line reports the shortest and longest stitch it asks for. Watch that line: a pattern that looks great on the grid can be asking for a 15 mm stitch.
Saving
Section titled “Saving”Type a name and click Save pattern. The pattern lands in your user patterns folder and appears in the fill panel’s Tatami pattern picker straight away. Load… pulls any existing pattern — bundled or your own — back into the designer to modify.
Saving under a bundled pattern’s name shadows it: your copy wins in the picker, and the original file is left untouched. Rename or delete your copy to get it back.
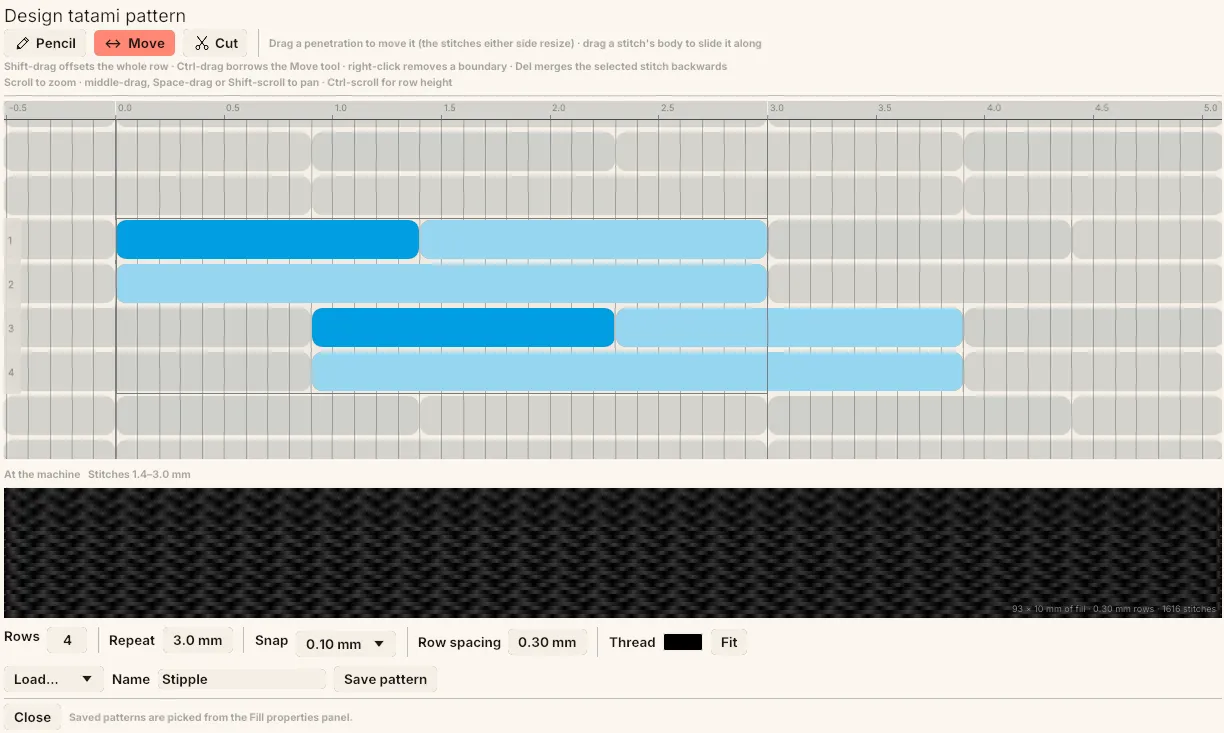 Each blue bar is one stitch, and the gaps between them are the needle drops. Note row 2’s stitch running off the right-hand edge of the 3 mm repeat — that’s the cyclic row. The strip under the grid reports what the machine gets (“Stitches 1.4–3.0 mm”), and the black band below it is the pattern sewn at the row spacing set on the right.
Where patterns live & sharing them
Section titled “Where patterns live & sharing them”A pattern is a single self-contained .octotatami file, so you can share one by
copying the file into:
- Windows —
%APPDATA%\octostitch\tatami - macOS / Linux —
octostitch/tatamiunder your config directory (e.g.~/.config/octostitch/tatami)
Octostitch reads its bundled patterns and this folder, with yours taking priority if a name clashes. The file name must match the pattern’s name for shadowing to work — which it does automatically for anything the designer saved.