
QR codes & pixel art
Two of Octostitch’s generators build a finished, stitch-ready design for you from something that isn’t a drawing: a piece of text, or a small raster image. Both live on the Tools menu, both lay their squares down as satin, and both stay editable after the fact.
Generate QR code
Section titled “Generate QR code”Tools → Generate QR code… encodes a URL or a piece of text as a QR matrix and stitches each module as its own small satin square.
| Setting | What it does |
|---|---|
| Content | The URL or text to encode |
| Module size | The side length of one QR square, in mm — this is what sets the overall size |
| Satin spacing | The stitch density within each square |
| Pull compensation | Over-stitches each module slightly at the rung ends so it stays full-size, and adjacent modules keep touching, once the fabric pulls in |
| Error correction | Low (7%) to High (30%) — how much of the code can be damaged and still scan |
| Foreground / Background | Thread colours for the dark and light modules |
| Stitch background colour | On: a fully-embroidered patch. Off: only the dark modules stitch, leaving the fabric as the background |
| Stitch order | Which colour block sews first |
The modal shows the resulting matrix size, the finished dimensions in millimetres and the square count live as you type, so you can see the code grow as the content gets longer or the error correction goes up.
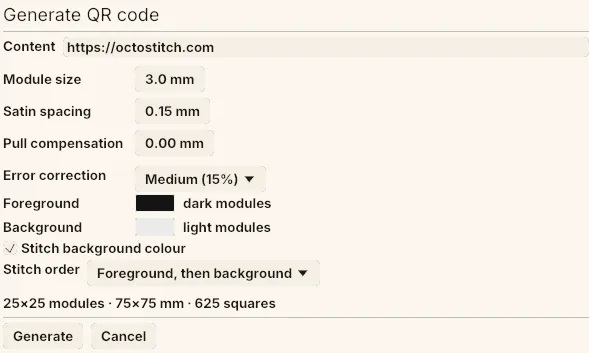 A URL at 3 mm modules and medium error correction. The readout at the bottom — 25×25 modules · 75×75 mm · 625 squares — updates as you type, so you can see the cost before you generate.
How it’s stitched
Section titled “How it’s stitched”The routing is doing a fair amount of work on your behalf:
- One colour change. Each colour is stitched as a single block, so a two-colour patch has exactly one thread change rather than one per module.
- Centre outward. Within a block, the modules are sewn from the middle out. Registration error accumulates outward from fabric that’s already been stitched, so the dense centre — the finder patterns and timing rows the scanner depends on most — lands first, and only the outer edge drifts.
- Touching squares are sewn, not jumped. Where two same-colour modules are grid neighbours, the needle walks between them; only genuine hops jump, so no long connecting stitch is dragged across a module of the other colour where it would hurt scanning.
- Checkerboard satin. Neighbouring modules alternate between horizontal and vertical satin, which breaks up the flat sheen of a solid block and gives the patch some texture.
Generate pixel art
Section titled “Generate pixel art”Tools → Generate pixel art… is the many-colour version of the same idea: it turns a small raster image into embroidery, one image pixel to one satin square.
- Pick an image. Octostitch quantises it to a palette automatically.
- Set Colours — the maximum palette size (2–64). The image re-quantises as you change it.
- Work through the Colour mapping list. Each row shows the quantised source colour, the thread colour it’ll actually be stitched in, a skip toggle, and how many pixels use it.
- Set Pixel size, Satin spacing and Pull compensation, and choose whether to Checkerboard satin direction.
- Generate.
A live preview of the mapped result sits beside the source image, so you can see what you’re about to stitch as you remap.
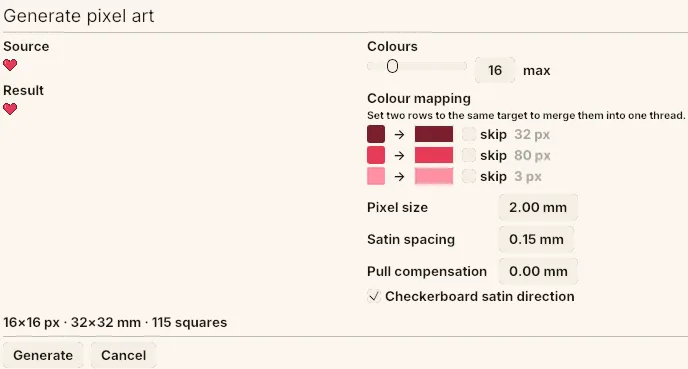 A small heart quantised to three colours. Each mapping row shows the source colour, the thread it’ll stitch in, a skip toggle and how many pixels use it — the 3 px row is the kind of near-invisible colour worth merging or skipping.
Merging and skipping colours
Section titled “Merging and skipping colours”The colour mapping list is the whole tool, really:
- Merging is emergent — set two rows to the same target colour and they stitch as one block, on one thread. That’s how you take a quantised palette of 16 down to the six threads you actually own.
- Skip takes a colour out entirely. Skipping the background is the usual move: it leaves the fabric showing through and cuts the square count — and therefore the stitch count and the sew time — dramatically.
Editing a generated design
Section titled “Editing a generated design”Neither generator is one-way. Select any object from a generated design and an ✏ Edit QR code… or ✏ Edit pixel art… button appears in its Object group. Click it and the original modal reopens with all your settings still in it — change the URL, the colours, the module size, anything — and Update regenerates the design in place rather than leaving you to delete it and start again.
The generated objects are ordinary Octostitch objects otherwise: you can move them, recolour them, and they export like anything else.