
Meta nodes
Meta nodes (M) are markers you place along a path to override certain stitch
settings at that point, so a single object can vary as it runs. Where an ordinary
anchor node changes the path’s shape, a meta node changes how
the stitching behaves at a position on the path — without adding or moving geometry.
What meta nodes control
Section titled “What meta nodes control”A meta node can override:
- Width — the stitch width (in mm) at that point. Place meta nodes along a satin column or zigzag to taper it — wide in the middle and narrow at the ends, for example — instead of a constant width.
- Angle — an absolute stitch direction (in degrees) at that point. By default stitches run perpendicular to the path; a meta node can force a specific world angle, which the stitching interpolates between neighbouring meta nodes.
Between two meta nodes the value is interpolated smoothly, so a couple of nodes are enough to describe a gradual change along the whole path.
The three modes
Section titled “The three modes”The Meta tool owns three different kinds of point, and they can sit on the same millimetre of path — so a strip at the bottom-right of the canvas says which one a click means, rather than leaving it to a hit-test race:
| Mode | What a click does |
|---|---|
| Nodes | Place and drag meta nodes — the tool as it has always behaved |
| Start | Place where the thread starts; right-click clears it |
| End | Place where the thread finishes; right-click clears it |
The same strip carries Clear start and Clear end buttons.
 The mode strip, with Start armed — the next canvas click places the start marker. Clear end is greyed out because this object has no end marker to clear.
Adding and editing meta nodes
Section titled “Adding and editing meta nodes”- Select the object and switch to the Meta tool (
M), in Nodes mode. - Click on the path to place a meta node at that position.
- Select a meta node — the side panel jumps to its Meta node group, which shows where the node sits (its segment, and how far along that segment it falls).
From there:
- Width — a slider in millimetres. Until you move it the node reads “Using
default width” and follows the object’s own width; once it’s overridden, the small
xbeside the slider resets it back to the default. - Override angle — tick this to force a stitch angle at the node, then set it in degrees. Untick it to go back to stitching perpendicular to the path.
- Blend — how the value leaves this node on its way to its neighbours.
Meta nodes apply to the stitch types that have a width or angle to vary — satin columns and zigzag in particular.
How far an angle override reaches
Section titled “How far an angle override reaches”An angle override doesn’t take over the whole path. It shapes its own stretch and then releases back to the path’s own normal — square to the path — at the next node either side of it, whether that’s another meta node or an ordinary path anchor.
That’s why a single angle override tilts the stitching around itself and fades out, rather than leaning the entire column the same way. If you want an angle held across a longer run, set it on meta nodes at both ends of that run; if you want it to release sooner, put a node closer in — any node the user can see bounds the fade, so even a plain width node will do it.
Blend modes
Section titled “Blend modes”| Mode | Marker | What it does |
|---|---|---|
| Linear | Diamond | A straight ramp to the neighbouring nodes |
| Smooth | Circle | Carries a curve through the node, so the value stays continuous across the whole path |
| Ease | Square | Flattens off so the value settles into the node — two Ease ends give a smoothstep |
| Hold | Filled square | Freezes the value until the next node, so it steps instead of ramping |
Each mode draws its own marker shape, so you can read a path’s blends straight off the canvas without selecting anything.
Removing a meta node
Section titled “Removing a meta node”Right-click a selected meta node with the Meta tool active to delete it. Nodes
that sit on an existing path anchor are part of the path and can’t be deleted this
way — clear their override with the x next to the width slider instead.
Worked example: tapering a leaf
Section titled “Worked example: tapering a leaf”To taper a satin leaf to a point at each end, place a meta node near each tip and set a narrow width (a millimetre or so), then one near the middle at the full width. Set the tip nodes to Ease so the width settles as it reaches the point rather than arriving at an angle, and the stitching will swell smoothly through the middle.
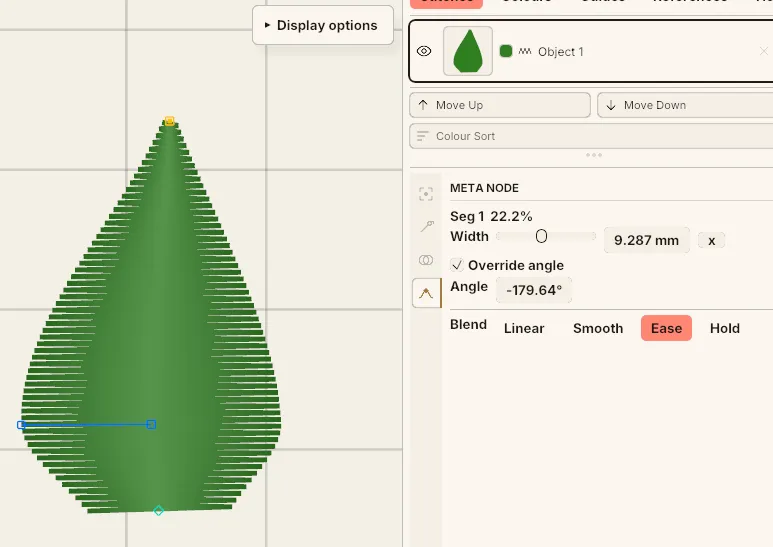 A meta node selected on a satin leaf — its width handle on the canvas, and the width, angle override and blend controls in the side panel.
Start & end markers
Section titled “Start & end markers”A start marker pins where the thread enters an object and an end marker pins where it leaves. They’re the Meta tool’s other two modes, and unlike meta nodes they belong to the object as a whole rather than to a point on a path.
Switch to Start or End and click. The marker draws as a diamond — green for the start, red for the end, the same markers a branch group uses for its entry and exit, because it’s the same idea. Right-click with that mode active clears it, and dragging moves it.
A marker names a place on the thread, not a place on the canvas, so it’s pulled onto the object’s own stitching the moment you drop it:
- On a fill, anywhere inside the shape is valid — the fill is re-routed to open on the row the marker lands on. Dropped outside, it lands on the outline, which is where the fill’s lead-in and lead-out run anyway.
- On a satin column, it lands on the centreline.
- On a line — running, bean, wide run, zigzag — it lands on the path.
Snapping at the moment you place it, rather than when the stitches are generated, is what makes the drawn position honest: where you see the diamond is where the thread goes.
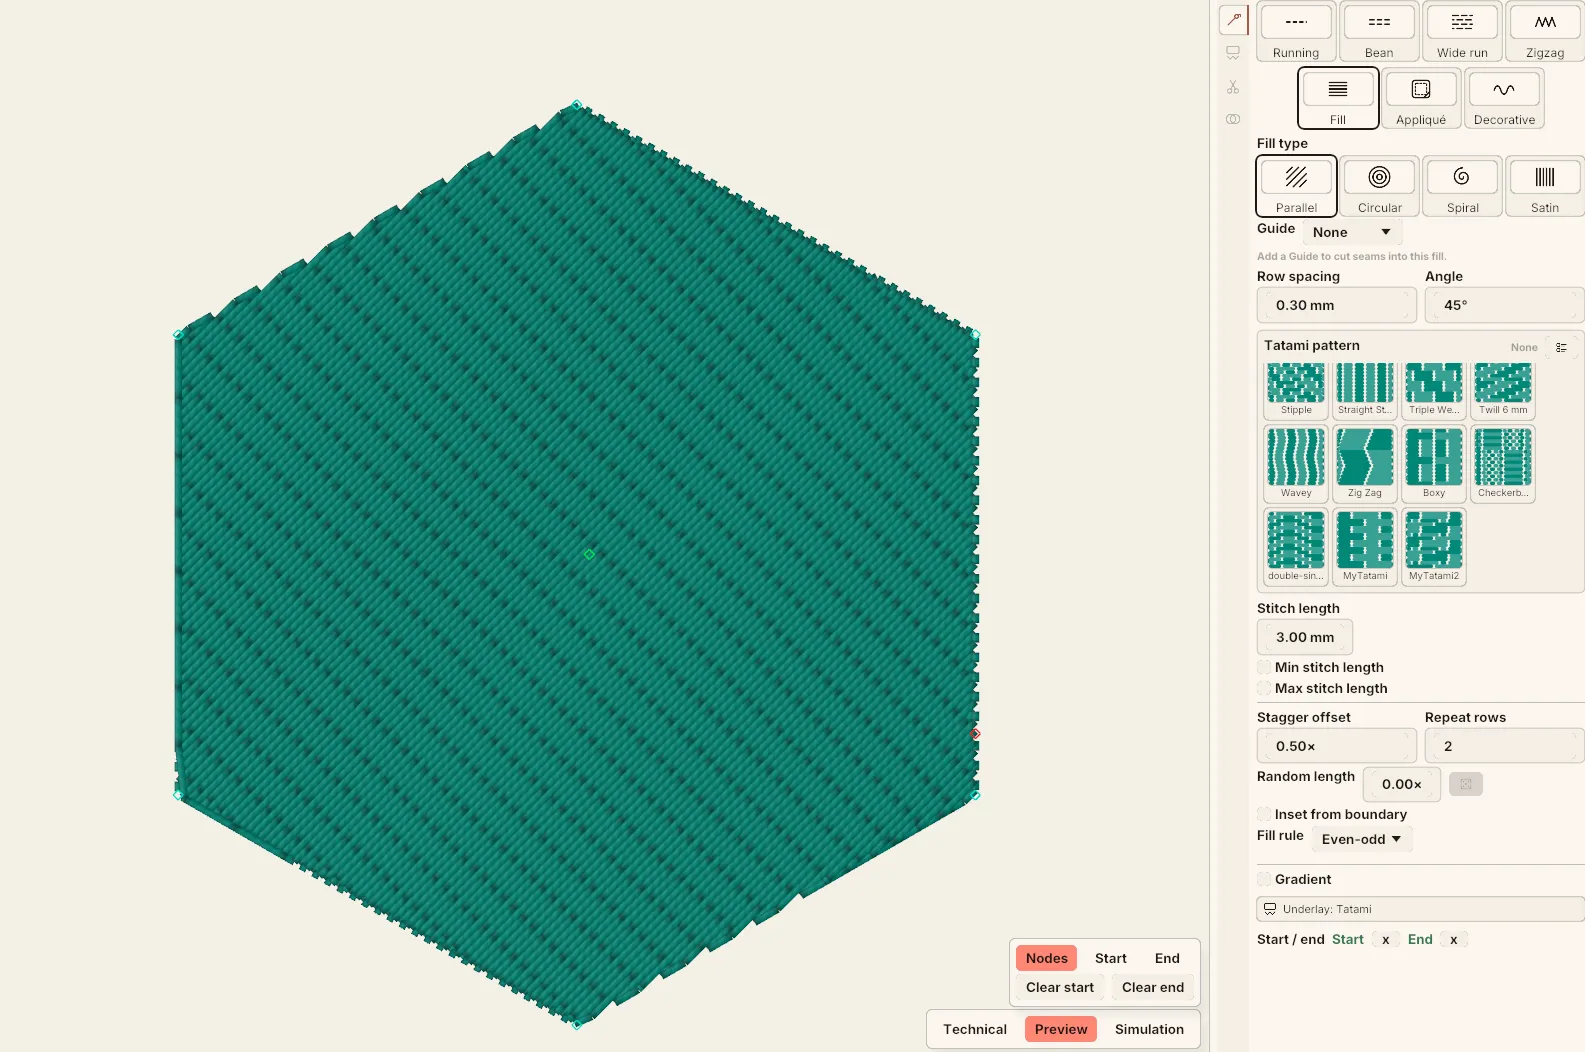 Both markers on a parallel fill. The green start diamond sits inside the shape — the fill is re-routed to open on the row it lands on — while the end marker sits out on the right edge. The side panel’s Start / end row lights both up, each with an
 x to clear it.
What a start marker does to a line
Section titled “What a start marker does to a line”On a running stitch, bean, zigzag or wide run, honouring the marker means handing the stitcher a path that already begins there, so the path itself is re-cut:
- A closed path is rotated — the segment under the marker is cut and its two pieces become the new first and last. The line still sews once, all the way round, just starting where you said.
- An open path is halved — each half runs outward from the marker, so both are sewn away from the point you pointed at rather than one of them retracing the other.
Meta nodes and node overrides come along with the cut, so a tapered zigzag stays tapered in the same places.
Which stitch types honour them
Section titled “Which stitch types honour them”The test is whether anything downstream actually reads the markers, not whether the shape has ends:
| Honours markers | Ignores them |
|---|---|
| Parallel and satin fills (including guided fills) | Circular and spiral fills — they sew outward from their centre |
| Satin columns | Running and bean with redwork routing on — redwork solves its own route |
| Running, bean, wide run and zigzag | Manual and decorative — already an explicit list of points |
| Guides — they never sew |
A marker on one of the right-hand cases would be a control that silently does nothing, so the option isn’t offered.
Reading and clearing them
Section titled “Reading and clearing them”The object’s Stitch settings carry a Start / end row that lights up Start and
End in green when they’re set, each with a small x to clear it. That row is the
way back out when a marker has wandered off screen — otherwise it’s only clearable by
finding it again. When neither is set the row reads “Place with the Meta tool.”
Select a marker and the panel shows its position in millimetres.
Why they matter
Section titled “Why they matter”Which end an object starts and finishes at decides where the machine arrives from and where it leaves for the next object, so the markers are a routing control: pin a fill to finish near its neighbour and a jump and a trim become a short travel stitch. See Branching & travel routing.
On a satin column, setting either marker disables Reverse direction — the markers already say which way round the column sews.