
Satin column
A satin column is the smooth, glossy stitching used for lettering, borders and tapering shapes. The stitches run straight across the column from one edge to the other, giving a solid sheen of thread. To draw one, see the Satin column tool.
Rails & width
Section titled “Rails & width”A satin column is built from two rails — its two long edges. Each stitch spans from one rail to the other, so the gap between the rails at any point is the width of the column there. Parallel rails give a constant-width band; converging rails give a taper. Add meta nodes to vary the width along the column independently of the rail shape.
You can draw the rails yourself with the satin column tool, or take a shape you’ve already drawn and convert it to satin — which traces the rails out of the outline for you.
Auto-split
Section titled “Auto-split”Long satin stitches — across a wide column — snag and loop and don’t hold well. Auto-split breaks stitches that would exceed the maximum length into shorter segments, keeping the surface smooth and secure on wide sections.
- Max stitch length (
max_stitch_mm) — the longest a single satin stitch may be before it’s split. 0 turns it off.
The cap covers every crossing of the column — the return leg back across is a stitch as long as the rung it came from, and it’s split too.
The extra needle drops are staggered across three phases from one crossing to the next, so no column of holes gets sewn down the length of the column where the splits land.
Short stitches on curves
Section titled “Short stitches on curves”On the inside of a curve, evenly spaced satin stitches crowd together and pile up
thread. Short stitches (short_stitches) shortens stitches on the tight (inner)
edge of curves so the density stays even and the inside doesn’t bunch.
Satin underlay
Section titled “Satin underlay”Satin columns support underlay to stabilise the fabric and lift the top stitches. You can combine:
- Centre-walk — a single run down the middle of the column.
- Edge-run — runs just inside each rail.
- Zigzag — one zigzag across the column at a set spacing.
- Double zigzag — a zigzag out and a second one back, half a spacing apart, so the return pass’s needle holes fall between the outbound pass’s. More body under a wide column.
Zigzag and double zigzag are the same pass sewn once or twice, so ticking one clears the other. Both read the same Zigzag spacing — each pass sews at that spacing and the two interleave, so a double zigzag at 2.5 mm lays holes every 1.25 mm.
A small inset keeps the underlay hidden under the satin.
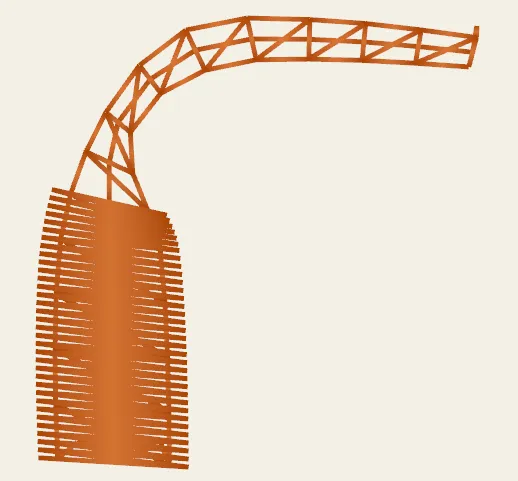 Edge runs and a zigzag lattice visible along the top of the column, and hidden under the finished satin below.
Pull compensation
Section titled “Pull compensation”- Pull compensation (
pull_comp_mm) — extends each stitch slightly past the rails so that, once the fabric pulls in under the stitching, the finished column lands at the width you designed. Wider columns and stretchier fabrics need more.
Spacing
Section titled “Spacing”- Spacing (
spacing_mm) — the density: the distance between two needle penetrations on the same rail, so it’s also how far the column advances between rungs. Tighter spacing gives fuller coverage but more thread and a stiffer result. New columns start at 0.35 mm, which sits at the dense end of normal without inviting thread breaks and puckering.
The satin fill and the zigzag read their spacing off this same peak-to-peak scale, so a shape filled with satin, a column and a stroke drawn beside it all come out at the same density from the same number.
Reversing the column
Section titled “Reversing the column”Reverse direction swaps the start and end of the column, so it sews the other way round. Both rails are reversed together, which keeps the rungs paired correctly.
It matters for routing rather than looks: which end a column starts at decides where the machine arrives from and where it leaves for the next object. Reversing a column so it ends near its neighbour can turn a jump and a trim into a short travel stitch — see Branching & travel routing.
Reverse direction is disabled once the column has a start or end marker on it — “Start/end markers set the direction”. The markers name points in the design and are resolved against the column’s centreline, so flipping the rails wouldn’t move them and the column would come back sewing the same way round. Move or clear the marker instead. See Start & end markers.