
Convert to satin column
Convert fill to satin column takes a shape you’ve already drawn — a traced outline, an imported SVG path, a filled blob — and rebuilds it as one or more satin columns, with real rails you can edit afterwards.
Use it when you have artwork as an outline and want it stitched as satin, rather than drawing the two rails by hand with the satin column tool.
Find it in the Modify group of the side panel. It’s available for any object with a path — manual stitches, guides and columns are already past this point, and the button says so when it’s greyed out.
It opens an editor in two stages: first you cut the shape into sections, then you set the direction the stitches run in each with rungs. Nothing is committed until you press Convert — Cancel leaves the object exactly as it was.
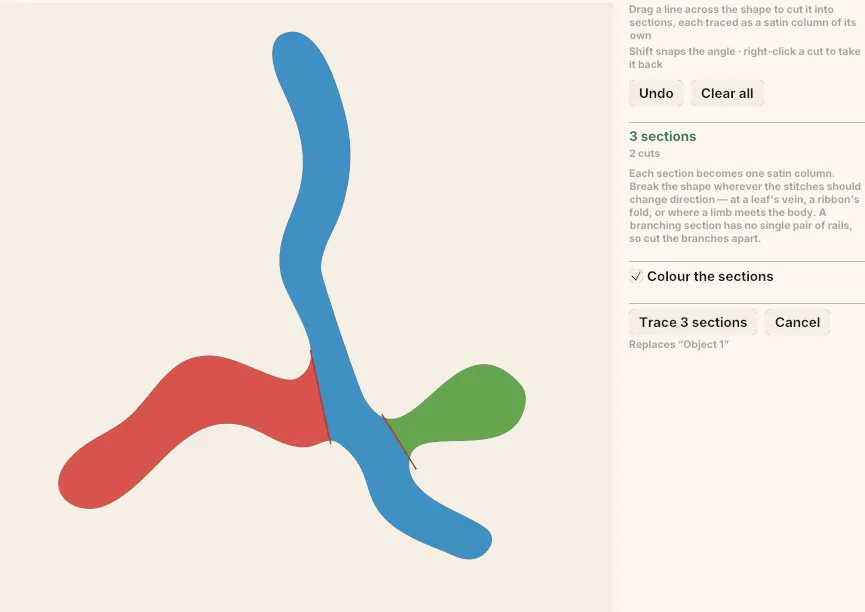 Two cuts, three sections. The shape has four arms meeting in the middle — cutting the left arm and the right lobe away leaves the top and bottom arms as a single column running through the junction.
Stage 1 — Section
Section titled “Stage 1 — Section”The shape is drawn flat, with no stitching on it yet — this stage is only about where it divides.
Drag a line across the shape to cut it into sections. Each section becomes a satin column of its own, so break the shape wherever the stitches should change direction:
- at a leaf’s vein
- at a ribbon’s fold
- where a limb meets the body
Anywhere the shape branches, it has to be cut. A junction where three or more arms meet has no single pair of rails — there’s no one way for the stitches to run through it — so the cuts are how you decide which arms carry on as one column and which become columns of their own. The shape above has four arms meeting in the middle: two cuts turn it into one column running top-to-bottom through the junction, plus one for each of the other two arms.
Left uncut, the shape converts whole.
| Gesture | What it does |
|---|---|
| Drag across the shape | Cut a new section |
Shift + drag |
Snap the cut’s angle |
| Right-click a cut | Take that cut back |
Undo (Ctrl/⌘ + Z) |
Take back the last cut |
| Clear all | Remove every cut |
The panel keeps a running tally — “3 sections · 2 cuts” — and tells you when you’ve hit the cut limit.
Colour the sections tints each piece so you can see the division at a glance. Turn it off to draw everything in the object’s own thread colour.
When the division looks right, press Trace n sections.
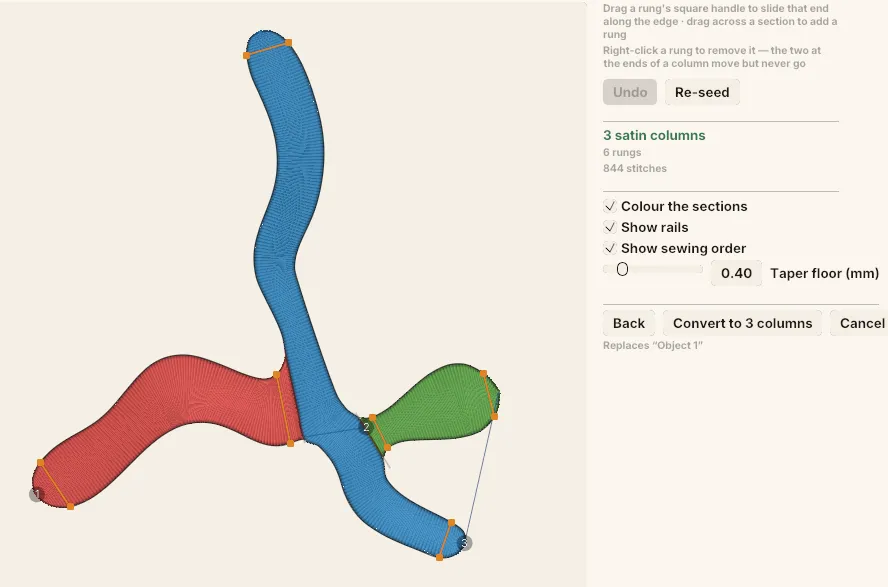 The same shape traced. Each section has picked up a rung at each end — six in all — and is drawn as the satin it will sew. The numbered badges are Show sewing order, with the thin line between them showing where the needle travels from one column to the next.
Stage 2 — Rungs
Section titled “Stage 2 — Rungs”A rung is a line across the column, from one rail to the other. It sets the direction the stitches run at that point.
Each section arrives with a rung across each end, and from here it’s drawn in thread — what you see is the stitching you’ll get.
| Gesture | What it does |
|---|---|
| Drag a rung’s square handle | Slide that end along the edge — this is how you set the stitch angle there |
| Drag across a section | Add a new rung |
| Right-click a rung | Remove it (the two end rungs move but never go) |
Undo (Ctrl/⌘ + Z) |
Take back the last rung drawn |
| Re-seed | Throw away every rung and trace each section again from scratch |
Tracing doesn’t re-run on its own, so your rungs stay put as you work. Re-seed is how you ask for a fresh automatic pass — it discards every rung you’ve placed.
View options
Section titled “View options”- Show rails — draw the two rails the section solved to.
- Show sewing order — number the sections in the order they’ll sew. Sections are sewn nearest-first starting from the longest one, each entered at whichever end the needle is already closest to.
- Taper floor (mm) — past an end rung the column keeps going in parallel rungs at that rung’s angle, each shorter than the last. This is where it stops: a stitch narrower than this would put both ends in one needle hole.
When a section won’t solve
Section titled “When a section won’t solve”The panel says which of the two problems you have, because the fix is different:
“n sections could not be traced” — nothing there has a spine to follow. The piece is too small, or too round to have a long axis at all. Draw a rung across each end of it by hand, or go Back and cut it differently.
“n sections’ rungs do not describe a column” — a column’s rungs run one way along the shape and never cross. Move back whichever rung has folded over its neighbour.
Going back
Section titled “Going back”Back returns to the sectioning stage. The cuts are kept; the rungs are not — a new cut moves the pieces out from under them. You’ll get a fresh set of end rungs when you trace again.
What you get
Section titled “What you get”Convert replaces the object with the columns.
The first column reuses the original object — same layer position, thread colour and lock state — so undo, branch membership and the layer list all behave as though you’d edited the object rather than swapped it. Extra columns are inserted directly beneath it, and everything ends up selected. When a shape converts to more than one column they’re numbered off the original’s name — “Object 1”, “Object 2” and so on. The panel says whose name that will be before you commit: “Replaces “Object 1”“.
The result is ordinary satin columns. Reshape the rails with the Edit tool, taper them with meta nodes, and set spacing, underlay and pull compensation as usual.